Post-Hurricane Roof Inspection Checklist — Document This Before You Call Your Insurance Adjuster
Published March 2026 · Ocean Group Construction
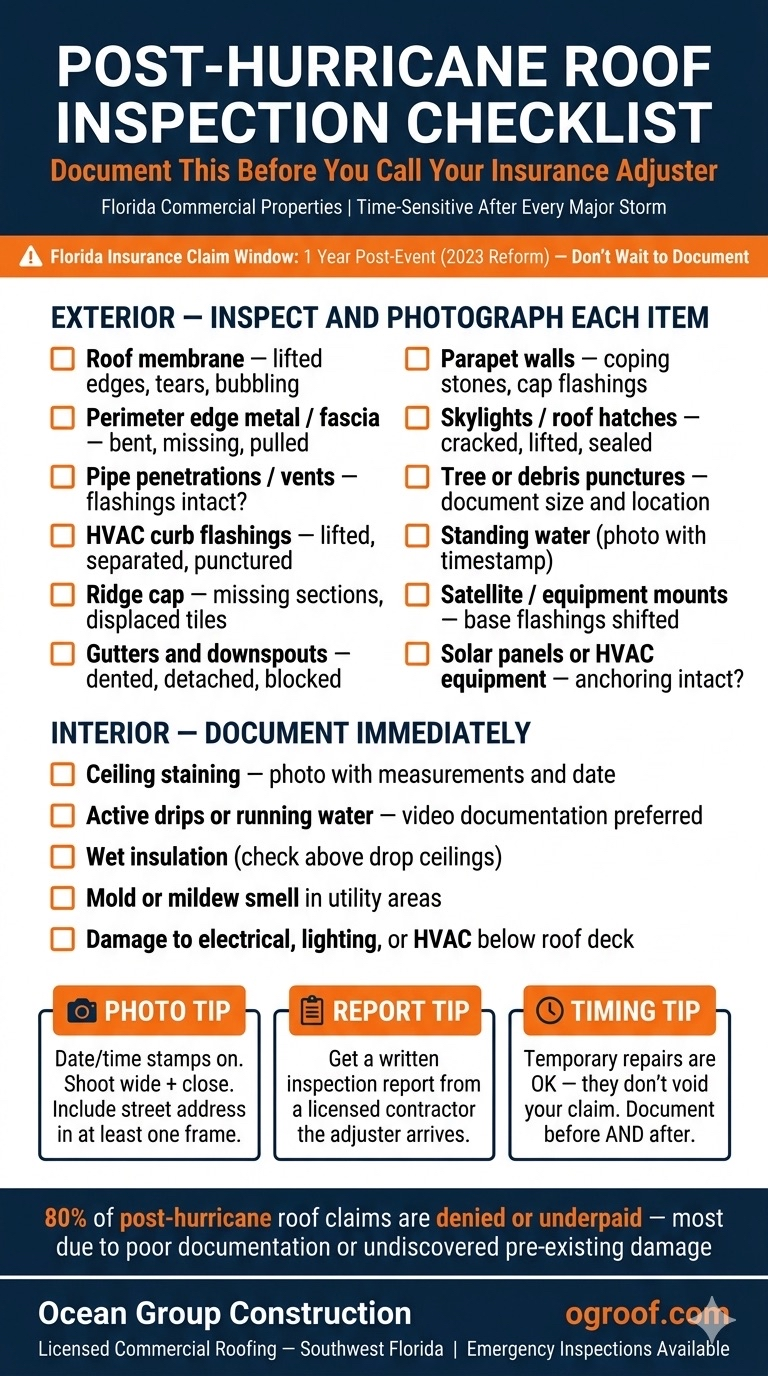
80% of post-hurricane claims get denied or underpaid. Here's how to not be one of them.
After a major storm passes. If you haven't prepared in advance, our hurricane season prep guide covers what to do before the next one., property owners and managers in Florida face a narrow, high-stakes window. Under the 2023 insurance reform legislation, you have one year from the date of loss to file a claim — and the documentation you compile in the first 48–72 hours after the storm will make or break what you recover.
The adjusters who show up know exactly what they're looking at. You need to know it too — or you need someone on your side who does. This checklist is what a professional inspection covers. Use it before you make that first call.
Why Most Claims Fail Before They Start
Insurance adjusters are trained to identify documentation gaps, pre-existing conditions, and damage that "cannot be definitively attributed" to the storm event. Without timestamped photos, a professional inspection report, and a documented pre-storm baseline, you are at a severe disadvantage in any claims dispute.
Common denial reasons:
- "Damage consistent with wear and deferred maintenance" — not storm damage
- "Insufficient evidence of covered peril"
- "Pre-existing condition not disclosed at policy inception"
- Claim filed outside the statutory window
A professional post-storm inspection report with photos, measurements, and specific damage attribution is your primary defense against each of these. Get it documented before the adjuster shows up — not after.
Exterior Roof Inspection Checklist
Work systematically across the entire roof surface. Don't just look at the obvious damage. Document everything.
Membrane and Field Surface
- Punctures, tears, or abraded areas in the membrane field
- Lifted or separated sections (balloon effect from wind uplift)
- Debris impact damage — note size and location of each
- Blistering or bubbling that wasn't present pre-storm
- Standing water more than 48 hours post-storm (potential drainage blockage from debris)
Edge Metal and Perimeter
- Bent, lifted, or completely displaced edge metal/fascia
- Gaps between edge metal and membrane — even minor separation allows water intrusion
- Missing sections of gravel stop or drip edge
- Parapet wall cap damage or displacement
Pipe Penetrations and Mechanical Curbs
- All vent pipe flashings — check for separation, cracking, or displacement
- HVAC curb flashings — wind uplift frequently breaks the seal at curb corners
- Pipe boots — check for tears, separation, or debris impact
- Conduit and electrical penetrations — document any that show movement
Ridge, Gutters, and Drainage
- Ridge cap — displacement or cracking on sloped systems
- Gutters and downspouts — document any deformation, separation, or blockage
- Roof drains and scuppers — document blockage from storm debris
- Interior drains — check that strainers are intact and drains are clear
Skylights, Satellites, and Solar
- Skylight glazing — cracks, frame separation, or sealant failure
- Satellite dish mounts — document any movement; penetrations may have shifted
- Solar panel mounts and racking — look for lifted panels, cracked seals at penetrations
- Any other roof-mounted equipment — document condition of all mounting points
Interior Inspection Checklist
Need a commercial roofing assessment?
We answer phones — not contact forms. Talk to a contractor who's been on a roof this week.
📞 Call 786-696-4829Roof damage often manifests first in the interior. Document everything before any cleanup or drying begins — insurance will want to see the damage in original condition.
Ceiling and Upper Walls
- Water stains — photograph all staining, measure affected area
- Active drips — if still dripping, photograph and timestamp
- Bubbling or sagging drywall or ceiling tiles
- Discoloration on walls, especially near exterior walls and in upper corners
Insulation and Structure
- Wet or compressed insulation in attic spaces — probe for saturation
- Any visible mold or mildew (even if storm just occurred — this indicates pre-existing moisture too)
- Structural members — document any signs of water contact on wood or metal framing
Electrical Systems Near Roof
- Water near electrical panels, junction boxes, or conduit runs
- Any equipment that may have been exposed to water intrusion
- Document but do not touch — call an electrician before restoring power to affected circuits
Photo and Documentation Protocol
How you document matters as much as what you document.
- Timestamp everything. Keep your phone's date/time stamp active on all photos. This establishes the timeline and ties documentation to the storm event.
- Photograph context + detail. For every damage area, take one wide shot showing location on the roof and one close-up showing the damage itself. Courts and adjusters need both.
- Document the undamaged areas too. Photos of intact sections establish your baseline and counter "pre-existing condition" arguments.
- Get a written professional report. Your own photos are evidence. A licensed contractor's written inspection report — with measurements, damage descriptions, and cost estimates — is your strongest asset in any dispute.
- Don't make permanent repairs before the adjuster visits. Emergency tarping is fine and necessary to prevent further damage. Permanent repairs before the adjuster documents the damage can void your claim. Get authorization first.
The Timeline That Matters
Under Florida's 2023 insurance reform (SB 2A), the claim window is now one year from the date of loss for new claims and one year for supplemental claims. This is tighter than the prior three-year window. Don't wait.
Best practice timeline:
- Within 24 hours: Complete exterior and interior documentation. Install emergency tarping on any breaches. Photograph everything before and after tarping.
- Within 48–72 hours: Get a professional inspection report from a licensed roofing contractor. This is your independent documentation.
- Within one week: File your claim with your insurer. The report goes with the claim.
- Before adjuster visit: Review the inspection report. Know what you're claiming and why. Don't let the adjuster be the only expert in the room.
Hurricane season in Florida runs June through November. The time to understand this process is before a storm — not during the 48-hour scramble afterward. If you don't have a roofing contractor you trust, that relationship needs to exist before June 1. For a complete pre-season strategy, see our guide to protecting your commercial roof before hurricane season. If the damage involves wind-related peeling or membrane uplift, our article on how wind damages commercial flat roofs explains the specific failure patterns to document.