The Commercial Roof Replacement Process: Every Step, No Mystery
Published March 2026 · Ocean Group Construction
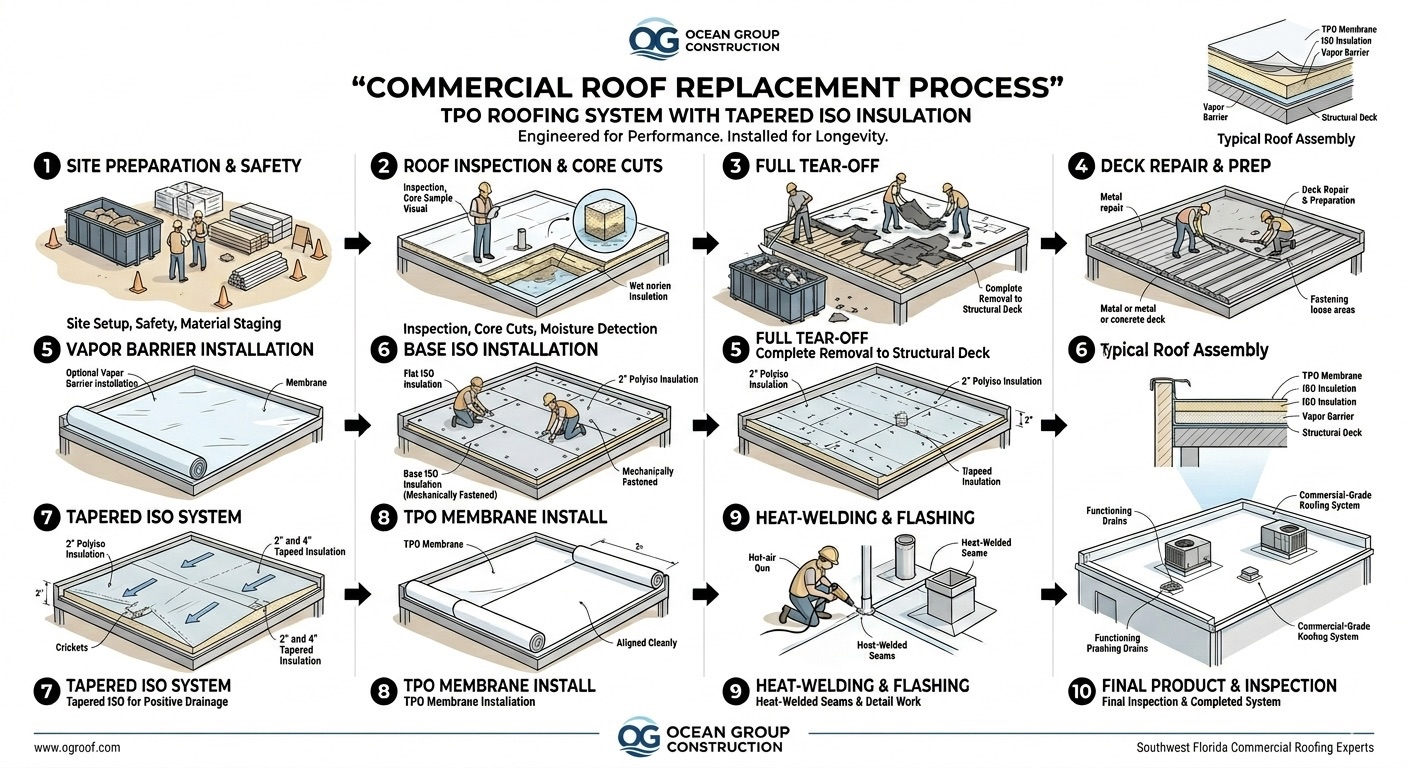
Here's exactly what happens when we replace a commercial roof — every step, no mystery.
Building owners and property managers deal with roof replacements infrequently — maybe once or twice in a career at a given building. Most of them have no real visibility into what's happening up there during a 5-7 day installation. Not sure if your roof needs replacing? Read the 7 signs it's time to replace your commercial roof.. They sign a contract, the crew shows up, and several days later they have a new roof. What happened in between is a black box.
Not anymore. Here's the full 10-step process we run on every commercial roof replacement.
Step 1: Site Prep and Safety Setup
Before anyone steps on the roof with tools, we set up the job site. That means establishing material staging areas (keeping heavy materials off the roof until they're needed — concentrated loading on old deck is a bad idea), setting up debris drop zones, protecting roof penetrations and drains from debris contamination, and establishing safety protocols.
In Florida — from Fort Myers to Jacksonville — we also check the 10-day forecast and plan the work sequence accordingly. We won't start a tear-off if there's more than a 40% chance of significant rain in the next 48 hours — exposed deck is a liability. We coordinate with the building occupants on noise, dust, and access. We notify neighboring businesses if debris drop zones are near shared areas.
This step takes 2-4 hours and is invisible to most building owners. It's also what separates a professional job from a crew that just shows up and starts cutting.
Step 2: Roof Inspection and Core Cuts
Before tear-off, we do a systematic inspection and take core cuts. Core cuts are small plug samples cut through the entire roof assembly — membrane, insulation, and down to the deck — at representative locations across the roof. They tell us:
- How many existing layers are there (affects disposal load and sometimes code compliance)
- Whether the insulation is wet or dry
- What condition the deck is in
- What the existing assembly consists of (not always what the old specs said)
Core cut information can change the project scope. If we find wet insulation in unexpected areas, we expand the deck inspection plan. If the deck has corrosion or section loss, we budget deck repairs before proceeding. Surprises found during core cut review are manageable. Surprises found mid-tear-off are expensive emergencies. We find them early.
Step 3: Full Tear-Off
In Florida, the Florida Building Code generally requires a full tear-off rather than recovering over existing systems, particularly when the existing roof has wet insulation or when the new system would create more than two roof layers. Full tear-off means removing the existing membrane, all insulation layers, and any fill or leveling materials down to the bare structural deck.
This is the loudest, dirtiest part of the project. Rotary tear-off tools cut and grind through the existing system. Debris gets bagged or conveyed to dumpsters at ground level. A full tear-off on a 20,000 sq ft building generates roughly 40,000-60,000 lbs of roofing waste, depending on how many existing layers are present.
Speed matters here — we move quickly to minimize the time the deck is exposed. In Florida's rainy season, we've had days where we tore off and got a temporary cover sheet down before 3 PM thunderstorms hit. That's not luck — it's planning.
Step 4: Deck Repair and Preparation
Once the deck is exposed, we walk it entirely. Every square foot. Steel deck corrugation gets checked for rust, section loss, and loose welds. High spots and debris get ground down. Old fasteners that are proud of the surface get driven flush. Any deck panels with more than 25% section loss get replaced.
Deck repair is billed as allowance work — we include a per-panel or per-square-foot rate in the contract because we can't know the full extent until the old system is off. In older Florida commercial buildings, deck repairs are common. UV, humidity, and hurricane cycles over 20-30 years take a toll.
The deck also gets cleaned of dust, adhesive residue, and any standing water before the next layer goes down. Clean, dry, flat deck is the non-negotiable starting point for everything that follows.
Step 5: Vapor Barrier Installation
On top of the clean deck goes the vapor retarder. In Florida's climate — hot and humid outside, air-conditioned inside — vapor drive pushes moisture from the exterior through the roof assembly toward the interior. The vapor barrier breaks that drive before it can saturate the insulation.
We install a self-adhering or mechanically fastened vapor retarder sheet directly to the deck, with all seams lapped and sealed. The installation is straightforward but requires attention to continuity — gaps or torn sections defeat the purpose. Every penetration location gets pre-cut and patched around before insulation goes down.
Step 6: Base ISO Installation
The first layer of polyiso insulation goes down on top of the vapor barrier. This base layer is full-thickness flat ISO — establishing the thermal performance of the assembly and providing the substrate for the tapered layer above. We use mechanically fastened ISO in most applications, with fasteners driven through the insulation and vapor barrier into the deck at engineered patterns.
Fastener patterns for insulation in Florida are not casual. They're calculated based on the same wind uplift forces as the membrane fastening — because the insulation has to stay attached under the same conditions the membrane faces. We use FM Global or manufacturer-engineered patterns and document the fastener type, length, and pattern for the project record.
Step 7: Tapered ISO System
This is where the drainage design becomes reality. The tapered ISO layer installs on top of the base ISO, transforming a flat substrate into a sloped drainage system. Every panel in a tapered ISO system is cut at a specific angle — typically 1/8" or 1/4" per foot — and laid out per the slope diagram developed during project engineering.
At every low point — every drain, every scupper — the ISO tapers to a minimum thickness (typically 1/2" or the minimum code-allowed thickness). From the drains, the panels angle upward toward the roof perimeter and ridges. At HVAC units and other obstructions, crickets and saddles divert water around equipment rather than letting it pool behind curbs.
A proper tapered ISO installation looks almost unremarkable to an untrained eye — just insulation panels. But the slope it creates is what makes the difference between a roof that performs for 25 years and one that ponds water and fails in 10. Read more about why drainage is the most critical factor in commercial roof longevity.
Step 8: TPO Membrane Installation
The TPO membrane rolls out over the tapered ISO in 10-foot or 12-foot wide sheets. We work from the low points toward the perimeter, unrolling and positioning sheets before fastening. Mechanically fastened TPO uses screws and plates driven through the membrane and insulation into the deck — the fastener rows become the overlaps for the next sheet, so they're covered and protected.
Sheet positioning matters. We maintain consistent overlap widths — typically 6 inches minimum — and ensure sheets are fully relaxed and temperature-acclimatized before welding. TPO that's installed cold and tight will wrinkle when it warms up. Wrinkles in field sheets create stress points. We get the membrane flat before it gets welded.
Step 9: Heat-Welding and Flashing
Seam welding runs concurrently with sheet installation. Automatic robotic welders run the field seams — calibrated to the ambient temperature and humidity, they maintain consistent weld temperature and speed across the entire roof. Every field seam gets probed after welding.
Detail work — HVAC curbs, pipe penetrations, parapet wall flashings, drain collars, edge metal — gets done with hand welders. This is where the skilled hours go. A complex penetration field with 20 pipes, 4 HVAC units, and a parapet on all four sides takes more time than the field work on a 15,000 sq ft roof. It's where experienced crews separate from inexperienced ones.
We apply liquid-applied waterproofing membrane at all critical detail areas as a secondary layer. Belt and suspenders. Because over 80% of commercial roof leaks start at details, and we're not leaving that vulnerability open.
Step 10: Final Product and Inspection
Before we call a project complete, we walk the entire roof systematically. Every seam, every detail, every penetration, every drain. We run a final probe check on any seams that were flagged during installation. We clear all debris from drain strainers and scupper boxes. We document the final condition with photos.
On warranted projects, we submit the installation documentation to the manufacturer for warranty registration — including fastener pattern records, material quantities, and installation compliance certification. Most manufacturers require a roof inspection by their own representative before issuing the 20- or 25-year warranty. We pass those inspections because we install to spec.
The building owner gets a complete project package: warranty documents, as-built installation records, maintenance recommendations, and photos of the finished system. Not a handshake and a signed permit. A record.
Timeline and Disruption
A standard 20,000 sq ft commercial roof replacement runs 5-7 working days in fair weather. Larger buildings or complex roofs take longer. In Florida, weather windows matter — we plan the sequence to minimize exposure and work around the afternoon thunderstorm pattern in wet season.
For occupied buildings, we sequence tear-off to limit exposed deck area at any given time, typically working in sections of 5,000-8,000 sq ft. If the building is particularly sensitive — a restaurant, a medical facility, a warehouse with moisture-sensitive inventory — we develop a specific weather contingency plan before the project starts.
The goal is simple: get your building protected, get it done right, and get off your roof without drama. That's what 10 steps done correctly looks like. To understand what separates a rigorous installation from a cut-corner one, see our breakdown of good vs. bad commercial roof installation practices. And when you're choosing who does the work, our guide to choosing a commercial roofing contractor covers the questions to ask before signing a contract.
Ready to talk about your building? Call or request an inspection below.