Where Commercial Roofs Actually Fail — It's Not Where You Think
Published March 2026 · Ocean Group Construction
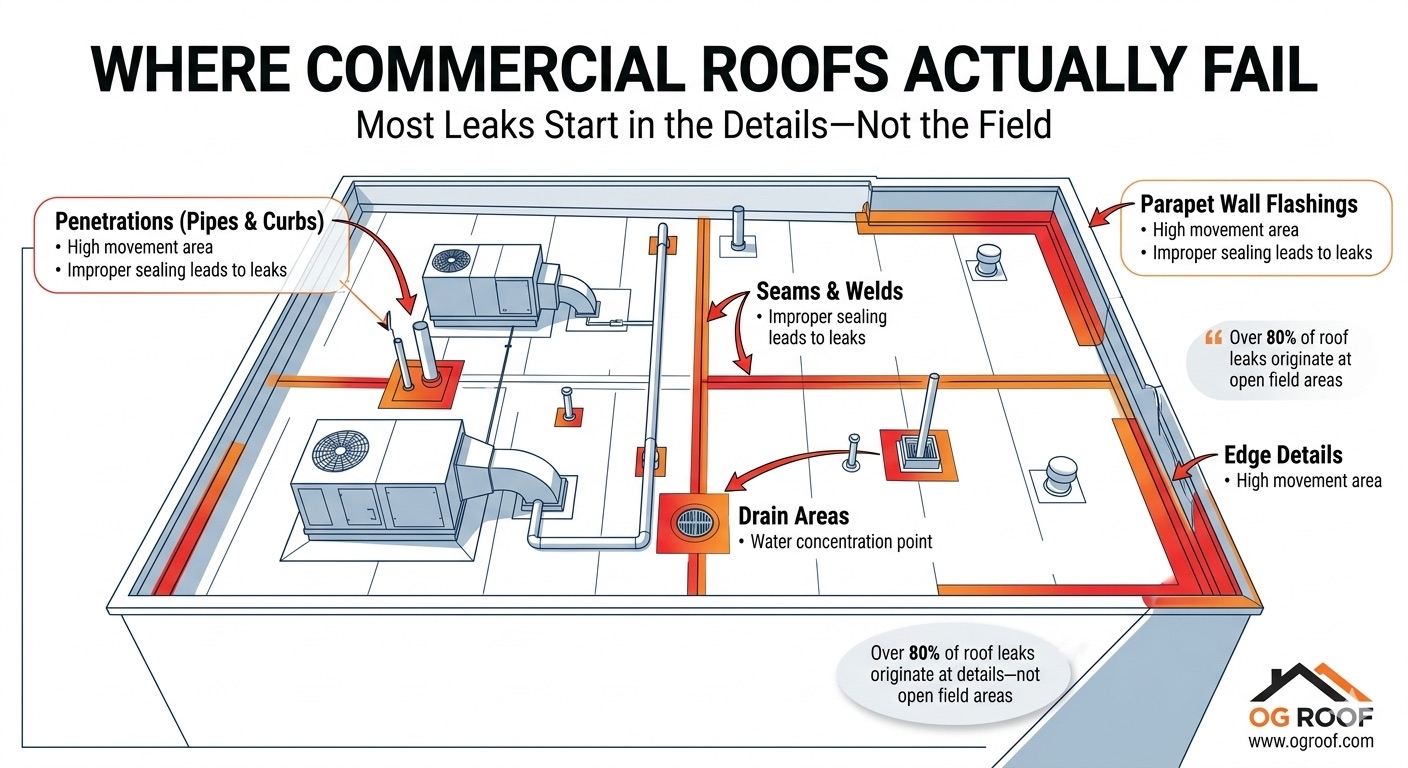
Over 80% of the roof leaks — which we break down by category in our guide on the weakest points on a commercial roof — we find don't come from the membrane. They come from the details.
That's not a guess — it's what shows up on every inspection report, every leak investigation, every emergency call we take in Southwest Florida. The big flat field of white TPO that's staring at you from the ground? That section almost never fails first. The failures happen where materials meet, where geometry changes, where the work gets complicated and takes real skill to execute.
Here's where commercial roofs actually fail, in order of frequency.
1. Pipe Penetrations and Equipment Curbs
Every pipe, conduit, vent, and HVAC curb that penetrates the roof membrane is a potential leak. And most commercial buildings have dozens of them — plumbing vents, electrical conduits, gas lines, refrigerant lines, flue stacks, and HVAC unit curbs, each requiring its own watertight flashing detail.
The failure mode is almost always the same: the boot or collar that seals the membrane to the penetrating object degrades. Rubber pipe boots — the most common solution for small round penetrations — have a lifespan of 8-12 years in Florida's UV environment. After that, the rubber cracks, the seal breaks, and water runs down the pipe into the building.
HVAC curb flashings are more complex. A curb requires the membrane to be cut, wrapped up and over the curb, sealed at the top edge, and counterflashed — all in a confined space with lots of geometry changes. When this detail is rushed or poorly executed, you get a flashing that looks complete but has gaps where water infiltrates during heavy rain. You often don't find these leaks until you take the HVAC unit off the curb on a re-roofing project and see the saturated insulation below.
The fix: Prefabricated pitch pockets with pourable sealer for irregular penetrations, TPO-clad curbs with factory corners for HVAC units, and secondary liquid-applied waterproofing membrane at all penetration bases.
2. Seams and Welds
Single-ply roofing membranes — TPO, PVC, EPDM — are installed in sheets and joined at overlapping seams. For TPO and PVC, those seams are heat-welded. The weld creates a fusion bond that, when properly made, is stronger than the membrane itself. When improperly made, it's a line of failure waiting for the right rain event.
The two most common seam failures: fishmouthing and incomplete welds. Fishmouthing is what happens when the membrane edge lifts — usually because of improper surface preparation or contamination. It looks like the corner of the seam has opened up. Under wind pressure, water drives into that gap. Incomplete welds happen when weld temperature or speed is off — the top surface looks bonded but the fusion doesn't penetrate the full overlap width.
In Florida, seam failures are particularly common along the edges of roofs where wind pressure is highest. A partially welded seam in the field might hold for 15 years. The same partially welded seam at the roof perimeter, where wind uplift is 2-3x higher than the field, fails in the first major storm.
The fix: Probe every seam during and after installation. Test the weld with a seam probe tool — it's not optional quality control, it's basic due diligence. If a contractor isn't probing seams, find a different contractor.
3. Parapet Wall Flashings
Want to know what this means for your roof?
One call. We'll tell you exactly where you stand.
📞 Call 786-696-4829Where the roof meets a parapet wall — the raised masonry or steel wall around the roof perimeter — you have base flashing at the bottom and counterflashing at the top. These two elements have to work together to prevent water from getting behind the membrane and running down the wall assembly into the building.
The #1 failure point here is the counterflashing reglet — the horizontal slot cut into the masonry where the top edge of the counterflashing is inserted and sealed. That sealant joint fails in 5-7 years in Florida's UV and thermal environment. Once it fails, water runs behind the counterflashing, under the base flashing, and into the wall cavity. By the time you find the interior leak, you've often got soaked wall insulation and potentially corrosion in the structural steel.
The second failure mode is inadequate base flashing height. Code minimum is 8 inches above the finished roof surface. We regularly find re-roofing projects where the original installation has base flashing at 4-5 inches — technically deficient, and definitely insufficient when standing water from a clogged drain raises the roof water level during a storm.
The fix: Replace counterflashing reglet sealant on a 5-year cycle. Verify base flashing height on every inspection. When re-roofing, install flashing that exceeds minimum code requirements — 10-12 inches is our standard.
4. Drain Areas
Roof drains are where water is supposed to go. They're also a consistent source of leaks — not because drains fail structurally, but because the membrane-to-drain interface degrades.
The drain flange is bolted to the structural deck or drain body below, and the membrane is clamped between the drain bowl and the drain ring. Over time, the clamping ring fasteners loosen from thermal cycling, the membrane around the drain compresses and wrinkles, and you get a pathway for water to run under the membrane rather than through the drain.
We also see clogged drain strainer baskets that back up water to levels that stress the membrane-to-drain interface. And in Florida's wet season — June through November — drains that aren't cleaned regularly become debris traps that compromise the entire drainage system.
The fix: Clean drain strainers monthly during wet season. Inspect drain-to-membrane connections annually. When re-roofing, replace drain clamp rings and apply secondary waterproofing membrane around every drain.
5. Edge Details and Perimeter Flashings
The roof edge is the last line of defense. Edge metal, coping caps, and gravel stops seal the membrane at the building perimeter and cap the top of parapet walls. They also see the highest wind forces on the roof — in hurricane conditions, edge metal uplift is typically 2-4x higher than field uplift.
Edge detail failures come in two varieties. The first is sealant failure at the edge metal joints — the horizontal gaps between pieces of edge metal and gravel stop. Standard ANSI/SPRI ES-1 installation requires specific joint treatments and cleating that many contractors skip. When these joints open up, wind-driven rain drives water directly into the insulation and deck.
The second is catastrophic edge metal uplift during hurricane or tropical storm events. When edge metal is undersized or improperly secured, wind gets under the lip of the metal and begins progressive peeling of the membrane from the perimeter inward. We've seen storms peel the perimeter 10-15 feet into the roof field from an edge that wasn't properly secured.
The fix: Specify edge metal that meets ANSI/SPRI ES-1 for the design wind speed of your location. Florida requires compliance with the Florida Building Code's high-velocity hurricane zone provisions in many counties — verify your edge metal meets the requirement, not just the minimum.
Why Details Matter More Than Membrane Brand
Building owners spend a lot of time asking about membrane brands. Should I use Firestone or Carlisle? 45 mil or 60 mil? GAF or Johns Manville? These are legitimate questions, but they're downstream of a more important question: are the details being done right?
A mediocre membrane with excellent detail work will outlast a premium membrane with poor detail work every single time. The field of the membrane is almost never the weak link. The details — every penetration, every seam, every flashing, every drain — are where your roof either holds or fails.
When we inspect commercial roofs, we spend most of our time at the details. That's where the story lives.
Want to understand how these failure points are addressed in a quality installation? Read Good vs Bad Commercial Roof Installation and see the full commercial roof system breakdown. Drainage failures at internal drains and scuppers are one of the leading causes of detail failure — our flat roof drainage guide explains the design factors that prevent those failures. And when you're seeing repeated failures at the same details, that often signals an ignored leak problem that's been compounding — see our guide on why ignoring commercial roof leaks always costs more.