Good vs Bad Commercial Roof Installation: What Looks Similar Today Performs Differently Tomorrow
Published March 2026 · Ocean Group Construction
Two roofs can look identical the day they're finished. Five years later, one is performing and one is leaking. The difference lives in the details you can't see from the ground — and often can't see even standing on the roof. Here's how to tell the difference.
The Problem With "It Looks Fine"
Commercial roofing is one of the easiest trades to cut corners in without detection. A white TPO membrane looks white whether it's installed correctly or not. Flat insulation looks the same as tapered insulation from five feet away. Heat-welded seams look the same whether they were probed or not. Pipe boots look intact until they fail.
This is the fundamental problem with low-bid commercial roofing — and why a structured maintenance program is the only early-warning system you have: the savings are invisible until they're not. The contractor who wins by 15% over the quality bid isn't doing the same work cheaper — they're doing different work. Less work. And the building owner won't know for 3-5 years, when the problems start showing up as ceiling stains and emergency repair calls.
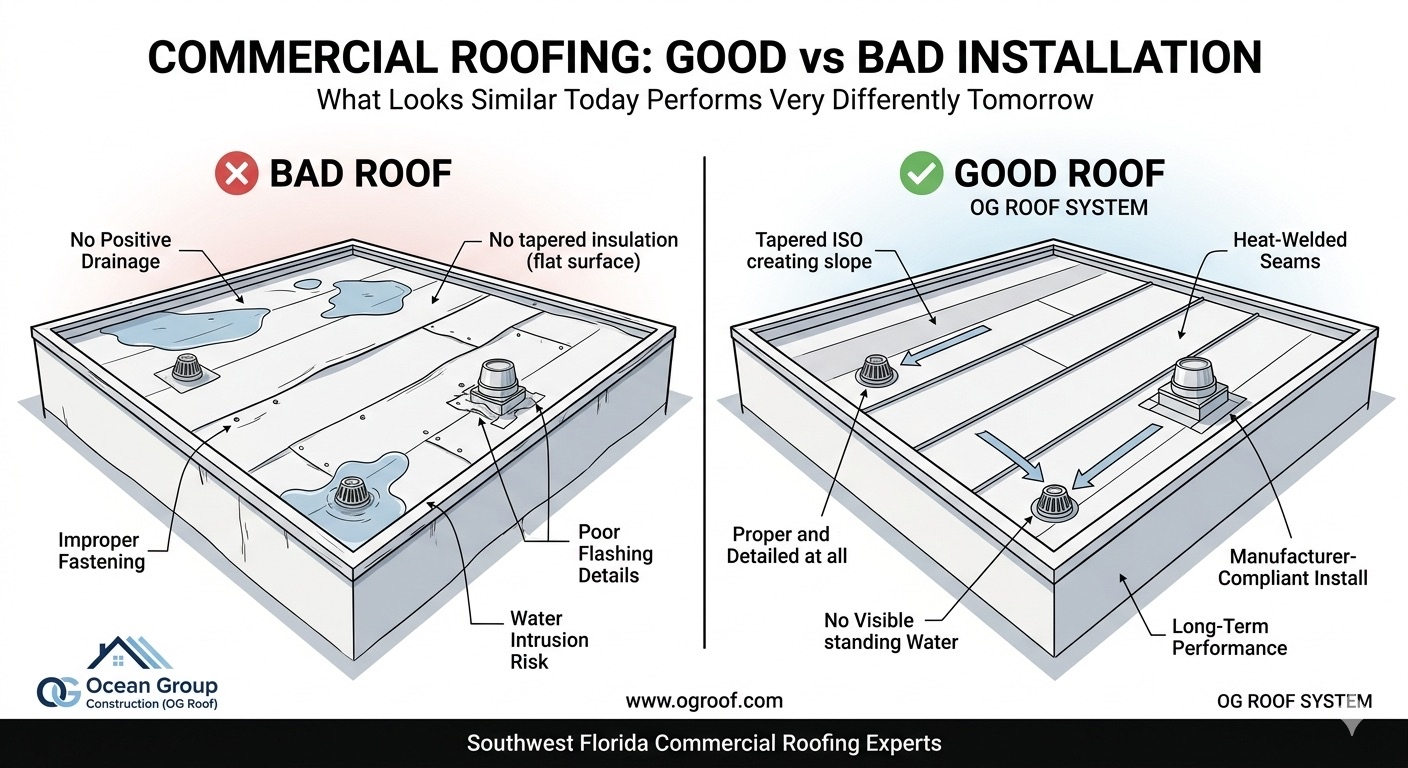
Bad Installation: What It Actually Looks Like
No Positive Drainage — Flat ISO Installation
The most common corner-cutting move in commercial roofing is installing flat polyiso insulation instead of tapered. Flat ISO is cheaper — both in material cost and labor time. It doesn't require a slope diagram, a layout plan, or any engineering. The crew just installs flat boards and moves on.
The result: a roof with zero designed drainage. Whatever slope exists comes from the structural deck (usually minimal) and whatever the building has settled into over time. Low spots collect water. Water ponds. Ponding water accelerates UV degradation, stresses seams, and eventually finds its way into the building.
We call this the "day one problem" — because from day one, the drainage isn't working. It just takes 3-7 years before the consequences show up as interior damage.
Improper Fastening Patterns
Mechanically fastened TPO requires fastener rows at specific spacings — determined by engineered fastener pattern calculations based on the building's wind zone, roof height, and roof zone (field vs. perimeter vs. corner). In Florida, this isn't optional guidance — it's required by the Florida Building Code and manufacturer's installation specifications.
A bad installation uses minimum fastener counts across the entire roof without accounting for the perimeter and corner zones where wind uplift is 2-4x higher than the field. This passes visual inspection. It passes even a basic audit. It fails during the first hurricane that puts real uplift pressure on the perimeter.
We've seen roofs peel from the perimeter inward like a rug being pulled up. This is what improper fastening looks like after a Category 2.
Poor Flashing Details
Flashings are where the real craftsmanship shows — and where bad contractors reveal themselves. A rushed flashing detail at a parapet wall has wrinkles, gaps, or inadequate height. A hurried pipe boot installation has the membrane termination sealed only with uncured lap sealant instead of a proper heat-welded termination bar. An HVAC curb flashing is caulked instead of properly welded and counterflashed.
These details look finished. They look acceptable. They leak in year three.
No Seam Probing — No Quality Control
A bad installation skips seam probing. The welder runs the roof, the crew follows up with terminations and flashings, and the job is signed off based on visual inspection. The seams look bonded. Some of them are. Some have partial welds that will hold until they don't.
This is the invisible quality cut that building owners can't catch without asking the right questions. "Do you probe seams?" If the answer is "we visually inspect all our work," that's not a yes.
Good Installation: The OG Roof System Standard
Need a commercial roofing assessment?
We answer phones — not contact forms. Talk to a contractor who's been on a roof this week.
📞 Call 786-696-4829Tapered ISO — Engineered Drainage From Day One
Every project we install gets a tapered ISO layout plan. Before a single piece of insulation hits the deck, we've mapped the slope directions, located the low points at drains, calculated the taper angles, and confirmed that every square foot of the roof will have positive drainage when installation is complete.
Tapered ISO costs more than flat ISO. It adds $0.75-$1.25 per square foot to project cost. It also adds 10-15 years to roof life by eliminating ponding water. On a 20-year roof system, that's not a cost premium — it's a return on investment.
Heat-Welded Seams with Documented Probing
Every seam gets welded to specification and probed. We use automatic robotic welders for field seams, which maintain consistent temperature and speed regardless of crew fatigue or ambient temperature variation. Hand welding is reserved for detail areas where the geometry requires it — not because it's faster.
Seam probing is documented. We can show you which seams were probed, when, and that they passed. This documentation matters if there's ever a warranty claim — manufacturer warranties require installation per specification, and seam probing is in most manufacturers' specs.
Proper Flashing Details at Every Transition
Flashing details get the same attention as field work. Every pipe penetration gets a proper pitch pocket or prefabricated boot, heat-welded to the membrane with a termination bar and lap sealant for redundancy. Every HVAC curb gets properly wrapped and counterflashed. Every parapet flashing goes to the correct height with reglet sealant applied.
We also apply liquid-applied waterproofing membrane at all detail areas — it's a secondary layer at the points most likely to see movement and stress. Belt and suspenders. Because the details are where 80% of leaks originate.
Manufacturer-Compliant Installation
This matters for warranty. Major manufacturers — Firestone, Carlisle, GAF, Johns Manville — offer extended warranties (20-30 years) on systems installed by certified contractors per their specifications. These aren't just marketing documents — they're technical installation standards developed by engineers who have analyzed thousands of roof failures.
When we install a Firestone or Carlisle system, we install it to their specification. Not approximately. To spec. Because that's what the warranty requires, and because those specs exist for good reason.
How to Tell the Difference Before the Roof Is Installed
You can't stand on the roof after installation and see most of these differences. You have to ask the right questions before the contract is signed:
- Does your bid include tapered ISO insulation with a slope layout plan?
- What fastener pattern calculations are you using for the perimeter and corner zones?
- How do you document seam probing?
- Is this installation certified under the manufacturer's warranty program?
- Can I see a detail drawing for the parapet wall flashings and penetration treatments?
A quality contractor answers these questions with specifics. A low-bid contractor either doesn't know the answers or tells you "we've been doing this for 20 years, we know what we're doing." Experience isn't the same as process. You want both.
Read more about what's in a commercial roof system and where commercial roofs actually fail to understand what you're evaluating when you look at bids. The specific failure points that bad installations leave exposed are detailed in our breakdown of the weakest points on a commercial roof. And drainage design — one of the most commonly cut corners — is covered in depth in our flat roof drainage guide.