Commercial Roof System Breakdown: What's Actually Protecting Your Building
Published March 2026 · Ocean Group Construction
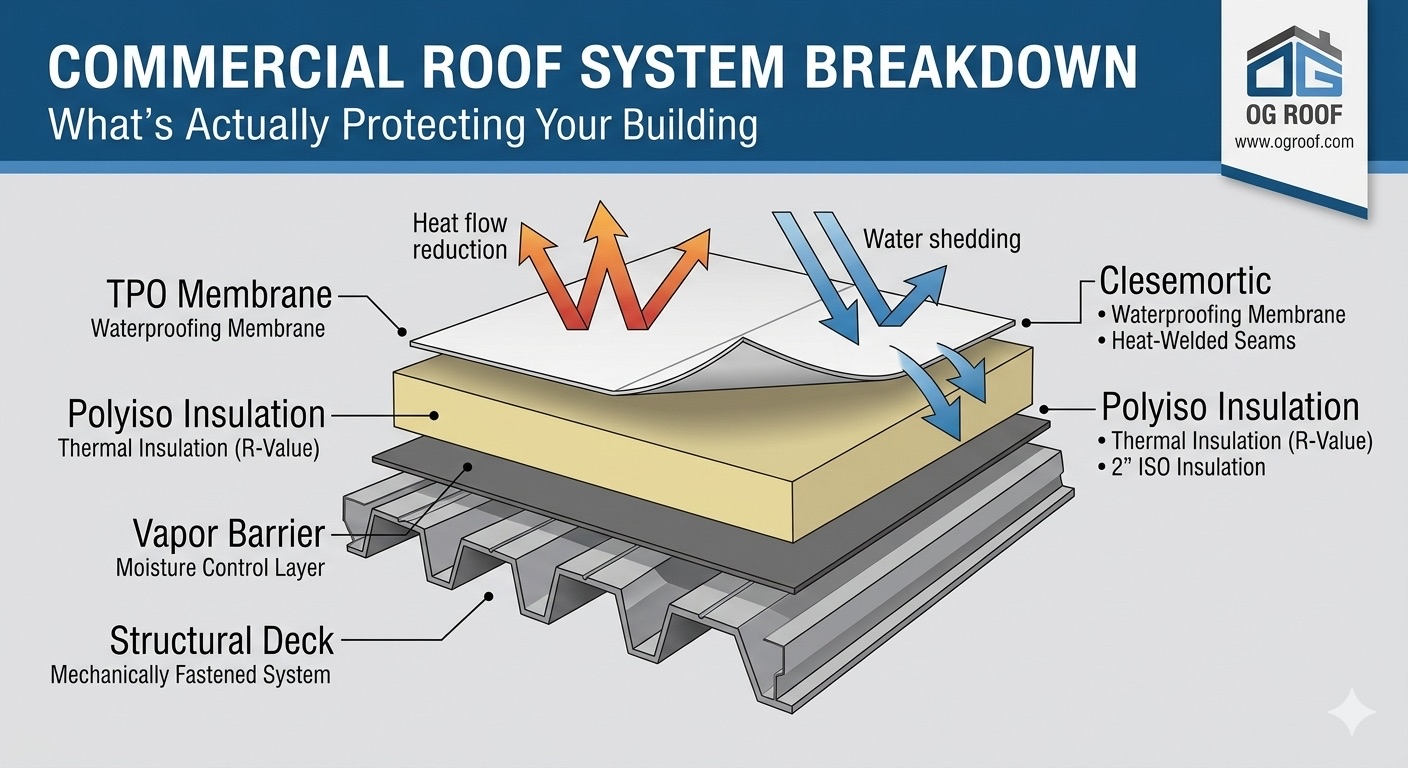
Most building owners — and even many property managers — have no idea what's between them and the rain. They know they have "a roof" — probably TPO or some kind of membrane — but they couldn't tell you how many layers are up there, what each one does, or why removing any one of them creates a problem.
That matters, because when a contractor cuts corners on a commercial roof — a problem we document in detail in good vs. bad commercial roof installation —, they do it in the layers you can't see. Here's the full stack — every layer, what it does, and why it can't be skipped.
Layer 1: The Structural Deck
Everything sits on the structural deck. In commercial construction, this is almost always corrugated steel deck — typically 22 or 20 gauge, spanning between steel joists or beams. The deck is the structural foundation of the roofing system. It determines what fastener patterns are possible, how much load the roof can carry, and whether the assembly below can properly support the system above.
Before we install anything on a deck, we inspect it. In Florida, where roofs have been through decades of wet-dry cycling, hurricane pressure cycles, and thermal movement — conditions common from Naples to Miami —, and thermal movement, steel decks develop rust, section loss, and loose fasteners. A new roof installed over a compromised deck is a problem waiting to happen. Core cuts during the inspection process let us check deck condition from below.
The deck isn't glamorous. But it's the foundation. We take it seriously — which is why pre-installation deck inspections are part of every job.
Layer 2: Vapor Barrier
Florida's climate creates a unique vapor drive challenge: the outside air is hot and humid, while the inside of your building is air-conditioned to 72°F. That temperature differential drives moisture vapor from hot to cold — which in Florida means from outside, through the roof assembly, toward the interior. Without a vapor barrier, that moisture accumulates inside the insulation layer, destroying its R-value and eventually causing rot, corrosion, and biological growth.
A vapor retarder — typically a self-adhering or mechanically fastened sheet installed directly on the deck — breaks that vapor drive. In high-humidity climates like Southwest Florida, this layer is non-negotiable. We see re-roofing projects where the vapor barrier was omitted on the original installation. The insulation is black with mold and the deck has surface rust. The whole system comes off.
Cost to include a vapor retarder: maybe $0.30-$0.50 per square foot. Cost to fix a system installed without one: full tear-off and replacement.
Layer 3: Polyiso Insulation
Questions about your roof?
Call us. Real contractor, real answers, no sales script.
📞 Call 786-696-4829Polyisocyanurate (polyiso) board is the workhorse of commercial roofing insulation. It delivers the highest R-value per inch of any rigid board insulation — typically R-6 per inch — making it the most thermally efficient option for the thickness constraints of commercial roofing assemblies.
In Florida's climate, insulation serves two functions. First, the obvious one: it slows heat transfer from the blazing roof surface down into your conditioned space. A properly insulated commercial roof can cut HVAC costs by 20-30% compared to minimal insulation assemblies. Second, it provides the substrate that, when tapered, creates the drainage slope that keeps water moving off the roof.
We typically install two layers of polyiso in a staggered pattern, with joints offset between layers. This eliminates thermal bridging at the joints and creates a more monolithic insulation layer. The total thickness — and therefore the total R-value — is spec'd by energy code compliance requirements, which in Florida require a minimum of R-25 for commercial low-slope roofs.
The top layer is often tapered to create drainage slope. See our post on why flat roof drainage matters for the full breakdown on why that slope is critical.
Layer 4: TPO Membrane
Thermoplastic Polyolefin — TPO — is the dominant single-ply roofing membrane in commercial construction today, and for good reason. It's heat-weldable, highly reflective, resistant to UV degradation, and performs well in both Florida's heat and the thermal cycling that comes with dramatic temperature swings after rain events.
TPO comes in 45 mil, 60 mil, and 80 mil thicknesses. We install 60 mil as our standard — it's the thickness that delivers meaningful puncture resistance, seam strength, and long-term durability without the cost premium of 80 mil in applications where the extra thickness isn't needed. For high-traffic roofs, rooftop patios, or projects with significant equipment traffic, 80 mil is the right call.
The white surface of TPO reflects 70-80% of solar radiation, which in Southwest Florida's intense sun translates directly into reduced cooling loads. On a 20,000 sq ft building, the difference between a white TPO roof and a dark modified bitumen roof can be $3,000-$8,000 per year in energy costs. That alone pays for the premium of a quality roof system over a decade.
TPO is mechanically fastened (screws through the insulation into the deck at engineered fastener patterns) or fully adhered (bonded to the insulation with bonding adhesive). Florida's hurricane wind requirements dictate which approach is appropriate — and what fastener patterns and densities are required. This is not a place to improvise.
Layer 5: Heat-Welded Seams
TPO sheets come in 10-foot and 12-foot rolls. Every seam where sheets overlap is heat-welded with an automatic robotic welder or a hand welder for detail areas. The heat-welding process melts both faces of the TPO together, creating a fusion weld that is stronger than the membrane itself when done correctly.
The operative phrase is "when done correctly." Proper welding requires the right temperature (typically 900-1,000°F air temperature at the tip), the right speed (calibrated to the ambient temperature and material thickness), and clean, dry membrane surfaces. A contaminated seam, a weld made in the rain, or a weld made at the wrong speed creates a bond that looks fine to the eye but fails under stress.
We probe every seam with a seam probe tool — a blunt instrument used to test weld integrity by applying lateral pressure. Failed welds show immediately. This is a quality control step that takes maybe 20 minutes per 10,000 square feet of roof and catches the problems before they become leaks.
Layer 6: Waterproofing Membrane at Details
The field of the roof — the big, flat, open sections — rarely fails. Details fail. Penetrations, seams at curbs, flashings at parapet walls, drain collars. These are the points where a secondary waterproofing membrane adds protection.
At Ocean Group, we apply a liquid-applied waterproofing membrane at all critical detail areas — pipe penetrations, HVAC curbs, parapet wall flashings, and drain areas. This creates a monolithic, seamless waterproofing layer at the points that see the most movement, thermal stress, and UV exposure. It's the belt-and-suspenders approach to the details that cause 80%+ of commercial roof leaks.
Read more about where commercial roofs actually fail to understand why detail waterproofing matters.
How the System Works Together
Each layer in this assembly does something specific, and they're interdependent. The vapor barrier protects the insulation. The insulation protects the membrane from thermal shock and provides the structural substrate for drainage slope. The membrane sheds water. The heat-welded seams and waterproofing membrane protect the details. Remove or compromise any layer and the system underperforms — sometimes catastrophically. For a comparison of how TPO, PVC, EPDM, and modified bitumen differ as the membrane layer, see our four-way membrane comparison. And to understand how long each system type typically lasts in Florida, our commercial roof lifespan guide has the real numbers.
This is why "cheaper roofing" usually isn't cheaper. A low-bid contractor who eliminates the vapor barrier, installs flat ISO instead of tapered, and skips the detail waterproofing has saved maybe $1.50 per square foot on a 20,000 sq ft roof — about $30,000. The premature roof failure that results costs $120,000+. That math never pencils out.
Want to see what this system looks like installed correctly? Check our project portfolio or schedule an inspection and we'll walk your roof with you.